 English
 Українська
 Русский
Screening PTA examines whether the hearing threshold levels at different frequencies are better, equal to, or worse than the specified screening level. The stimulus is delivered to the ear at specific frequencies and levels that have been chosen for screening. The subject passes the screening test according to predefined criteria, e.g., a pass occurs if all stimuli are heard in each ear. Screening at certain selected levels and frequencies is typically faster but provides less information than measuring hearing thresholds using common PTA procedures.
Different PTA modules are available:
– PTA 4 for assessing AC pure-tone thresholds at frequencies from 125 Hz to 6 kHz with stimulus levels from -10 to 70 dB HL in compliance with IEC 60645-1 class 4.
– PTA 4 Advanced for assessing AC pure-tone thresholds at frequencies from 125 Hz to 8 kHz with stimulus levels from -10 up to 110 dB HL in compliance with IEC 60645-1 class 4 with extended frequency and level range.
– PTA 3 for assessing AC and BC pure-tone thresholds in compliance with IEC 60645-1 class 3.
Frequencies and levels are the same as for PTA 4 Advanced. Due to the limited capacity of the electro-mechanical bone conductor, BC stimulus levels are lower. The module also provides a contralateral masking option, presentation of different stimulus types (pure-tone, pulsed pure-tone, warble tone), and automatic threshold detection procedures (Békésy, Hughson-Westlake).
– PTA-HF for assessing pure-tone thresholds at high frequencies from 9 to 16 kHz. PTA-HF is
only available with specific headphones, e.g. Sennheiser HDA 300.
PRACTICAL USE
Select Audio from the module selection screen. Select the preset that you would like to use. If necessary, change the parameters (e.g. audiometry protocol). If Expert mode is selected, the user interface appears as shown in Figure 1. Press the settings button ⑬ (PTA3 only) in order to select the transducer and its placement (AC, BC mastoid, BC forehead), select the stimulus type (pure-tone, pulsed pure-tone, warble tone), switch to uncomfortable loudness (UCL) mode, activate automatic testing, or activate the bilateral audiogram view (plot data from both ears in one audiogram graph).
Please note that you can also switch transducers by pressing the AC button ③ which toggles from AC to BC (mastoid) to BC-F (forehead) if an AC and a BC transducer are connected. For some subjects (e.g. children) a pulsed pure-tone or a warble tone may be more interesting than a continuous pure-tone and hence may be preferred. For the Békésy procedure, pulsed stimuli are used. For subjects with a tonal tinnitus, a pulsed pure-tone or warble tone may distinguish the stimulus from the tinnitus more efficiently. Enable masking mode if required by pressing the masking button ⑫ (see METHODOLOGY). Masking mode can be left by pressing button ⑭.
Before the transducer is fitted and the test is started, the subject must be instructed about the task. The subject shall indicate if a tone is heard or not, e.g. by raising a hand or pressing the patient response button if a tone is heard or by putting down the hand or releasing the patient response button if no tone is heard. For pulsed tones, please make sure that the subject understands to respond to the pulsed tone once (i.e. indicate heard as long as the pulsed tone is audible) and not for each single stimulus pulse. The test is not intended to be self-controlled by the subject. Manual tests must be fully controlled by the examiner. Automatic tests do not need level/frequency control by the examiner, but should be supervised by qualified personnel nevertheless.
Select the test ear by pressing the ear button ⑪. The currently active ear is shown. If loudspeakers are connected or binaural measurement is enabled on the device, also binaural stimulation can be selected. Perform either a manual test or an automatic test at the selected frequencies. For further information about a typical workflow of pure-tone audiometry see e.g. ISO 8253-1 and ASHA (2005).
During manual tests, stimulus frequency ⑧, level and/or masking level ⑦ (in masking mode masking level buttons are highlighted with a gray area) can be selected. The selected levels can be read from the crosshairs in the audiogram (red: right ear, blue: left ear, black: binaural, green: masking) and from the values between the selector elements (in Figure 1: stimulus level: 40 dB HL, making level: -10 dB HL). For PTA-HF, the audiogram shifts to higher frequencies when moving the crosshairs beyond 8 kHz. In masking mode, either the stimulus level or the masking level or both levels locked together can be controlled. The locked mode can be activated by pressing the lock
button ⑮. The stimulus level buttons can be configured in the device Audio Preferences (up arrow: decrease level, down arrow: increase level or vice versa). The stimulus can be presented as long as the loudspeaker button ⑨ is pressed. If the stimulus is played, the orange status indicator ① is on. If the masking noise is played, the green status indicator ② is on. If the patient response button is pressed, the large green status indicator ③ is on. If a threshold is determined, set the symbol at the position of the red or blue crosshairs ⑥ by pressing the audiogram ⑤. The symbol can be toggled from heard to not heard to deleting the symbol. The test can be finished with the stop button ⑩.
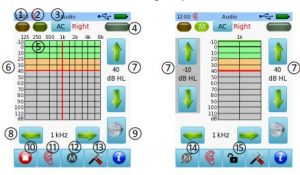
Figure 1: Audio Expert user interface (left: standard mode; right: masking mode).
Hearing thresholds are plotted across test frequencies in an audiogram form. Right ear symbols are plotted in red, left ear symbols in blue, and binaural symbols in black. The used symbols refer to ISO 8253-1, Table 1. BC symbols can be plotted as proposed by ISO 8253-1 or mirrored (usual representation e.g. in Germany). The BC symbol and no response symbol representation can be configured in Audio Preferences.
The audiogram is divided into three colored zones: green (normal hearing ≤ 20 dB HL), orange (mild hearing loss >20 to 40 dB HL), and gray (>40 dB HL: moderate to profound hearing loss).
For the interpretation of the result, the following hints may be considered (see Figure 2):
– Conductive hearing loss: Audiogram shows normal bone conduction thresholds, air conduction thresholds are poorer than normal by at least 10 dB. This air-bone gap occurs due to the damping of the air conduction stimuli on the way through the outer and middle ear. A conductive hearing loss typically occurs due to outer or middle ear problems including abnormalities of the tympanic membrane, occlusion of the auditory canal (e.g. by cerumen),
middle ear infection or fluid (e.g. otitis media), perforation of the tympanic membrane, ossicular defects.
– Sensorineural hearing loss: Audiogram shows air and bone conduction thresholds that are both within a range of about 10 dB. Thresholds are higher than 20 dB HL. A sensorineural hearing loss typically occurs due to lesions of sensory cells, auditory nerve, or central auditory pathways (presbyacusis, noise-induced hearing loss, Menière’s disease, vestibular schwannoma).
– Mixed hearing loss: Mixture of conductive and sensorineural hearing loss.
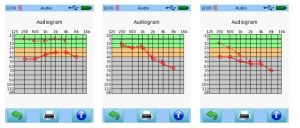
Figure 2: Audio result examples (left: conductive hearing loss; middle: sensorineural hearing loss; right: mixed hearing loss with conductive and sensorineural components)
Screen, Diagnostic and Auto Audio protocols provide adapted user interfaces as shown in Figure 3. The user interfaces of these protocols are in many parts similar to the Expert user interface. In the following the differences are explained. The Screen user interface provides a result table ① instead of an audiogram graph. The table contains either the tested level (heard) or NR = no response (not heard). The currently active frequency/level combination is highlighted in the result table. The Auto Audio user interface provides a play button ③ instead of the loudspeaker button, which allows starting the automatic threshold detection procedure. The patient’s response, which is read from the patient response button, influences the direction of the stimulus level. If a threshold is detected by the automatic algorithm, it is automatically set in the audiogram graph. In all protocols, there is no settings and no masking button. Instead, in the footer you have direct access for changing the stimulus type (pure-tone, pulsed pure-tone, warble tone) by pressing the stimulus type button ②.
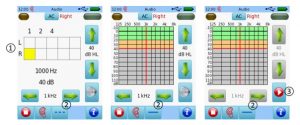
Figure 3: Audio user interfaces for different protocols (left: Screen; middle: Diagnostic; right: Auto Audio).